Tip of the Week: Troubleshoot Your Slow Computer Like an IT Pro

If your Windows PC is acting sluggish, you may want to “check under the hood” to see how your disk space is looking. If you see that your PC is regularly hanging out in the 90-percent-or-higher zone, then you’ll want to do something about that. Here’s how to check the status of your computer’s disk usage space, along with some best practices for troubleshooting performance issues.
How to Check Your Disk Usage Space
To check your disk usage space level, open the Task Manager by pressing Ctrl + Alt + Delete, and selecting Task Manager from the list provided. If it’s not already displayed, then select the Processes tab. Here you will see four processes listed; CPU, Memory, Disk, and Network.

You should see these figures change every few seconds as your PC compensates for the workload in real time.
What you want to be on the lookout for is one of these columns hitting more than 90 percent. If it reaches this level, Windows will make it obvious by highlighting the entire column red (red means bad). Now, if the column tends to turn red on occasion, then you don’t have too much to worry about, seeing as this is fairly normal (although, continue reading because you still may benefit by enacting the following best practices). For example, if you start to load an application that requires a lot of computing power to boot up, your CPU levels will spike until the application is fully loaded. Alternatively, if you see that one of the four columns is constantly red, then you may have just isolated the cause of your PC’s slow performance.
Perform a Clean Boot
A clean boot is a way to load Windows with the fewest drivers and startup programs possible. Essentially, performing a clean boot is a way to determine whether the performed issue is caused by Windows or a third-party program.
Also, to better understand what a clean boot is, visit the Microsoft support page.
If you go through the clean boot process and everything checks out, then you want to check each app by enabling each one. Be sure to do this with your Task Manager menu open by starting up each program and watching the processes to determine if that particular program is causing the slowdown or not. For example, one resource-intensive program known to cause slowdowns is Skype. When you go through the clean boot process, see how your PC runs with and without Skype enabled.
Check Hard Disk for Errors
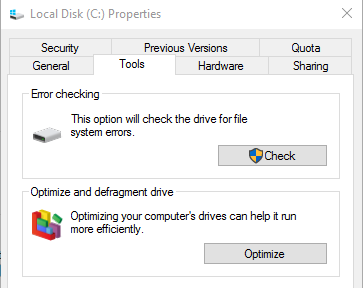
If it’s not the software causing performance issues, then it very well could be the hard drive. In Windows, checking for hard disk issues is a fairly automatic process; click File Explorer on the bottom tray, then right click the C: Drive and click on Properties at the bottom of the drop down menu. Now click the Tools tab and you will see a section called Error checking.

Click the Check button to begin the error checking process. Windows will then check the drive for errors, report back to you if it’s found any, and give you the option to Scan drive. Go ahead and scan the drive to find out for sure if it’s the source of your problems or not. If Windows happens to find any issues with your hard drive, then you’ll want to consult an IT professional to make sure it’s taken care of properly without deleting any of your sensitive data.
These two practices are easy ways to give you an overview and resolve some of the more basic PC performance issues, but there are several more (and more complex) ways that you can check and tweak your PC’s performance. To have an IT professional take an indepth look at what’s causing your computer’s problem, reach out to Resolve I.T. at (978) 993-8038. While you’re on the phone, be sure to ask about our remote monitoring and maintenance service. It’s a smart way to keep your company’s computers running smoothly so small issues don’t turn into major problems that will negatively affect productivity and cause downtime.


